OAuth 2
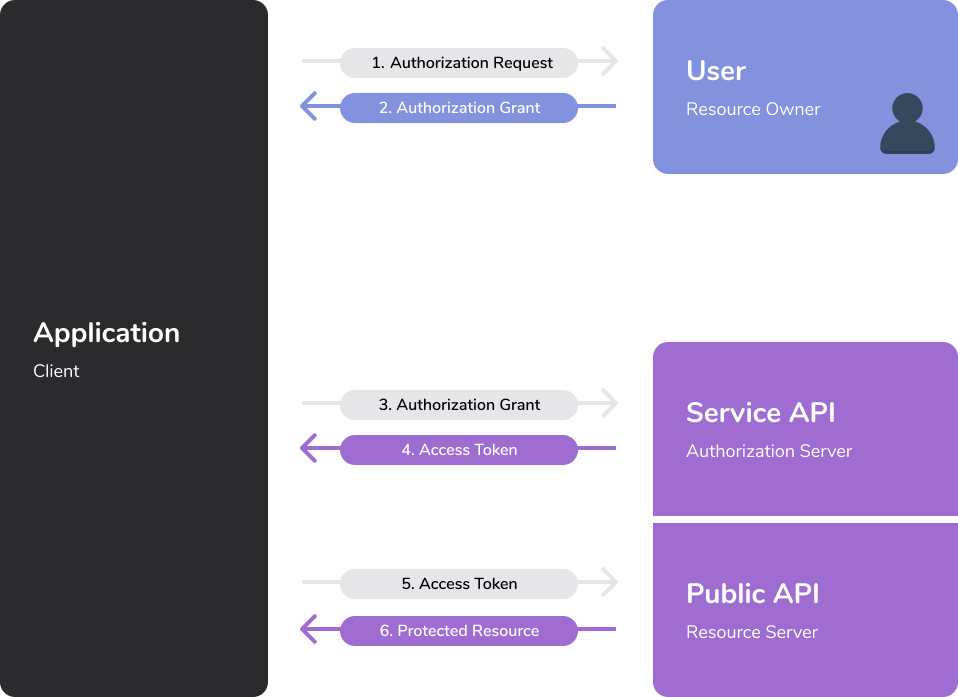
OAuth2 is an authentication standard that allows any user to use your application. OAuth allows you to obtain an access token, which you can use to authenticate the user in API requests.
If you intend to use the API only for yourself, you can use a developer token that will be linked to your account, which is easier to set up.
OAuth can be complicated to set up for developers, because of the number of steps, but we will try to make it as simple as possible here, so that you can use the API fully, and always safely.
The easiest way to use OAuth authentication is to use a library in the language of your choice. Here are a few of our team's choices depending on the language, but you can take the library of your choice. The authentication server supports OpenID Connect.
| Language | Library |
|---|---|
| JavaScript | passport with openid-client |
| PHP | league/oauth2-client |
| Python 3 | oauthlib |
| Ruby | oauth2 |
More libraries and resources can be found on the OAuth website.
Here are the URLs used by the API.
| URL | Description |
|---|---|
| https://sso.chaster.app/auth/realms/app/protocol/openid-connect/auth | Authorization URL |
| https://sso.chaster.app/auth/realms/app/protocol/openid-connect/token | Token URL |
Obtaining an access token with OAuth
Obtaining an access token is a three-step process:
- Asking users for scopes
- Wait for the user to approve the connection and scopes
- Exchange the obtained temporary authorization code for an access token

Step 1: Request authorization from users
Your application should redirect users to the Authorization URL (see the table above).
You will need to pass the following GET parameters:
- client_id=client_id: the application's client ID
- redirect_uri=CALLBACK_URL: URL to redirect back to
- response_type=code: specifies that your application is requesting an authorization code grant
- scope=profile: specifies the scopes your application is requesting, separated by a space
- state=state_key: should be used to prevent forgery attacks, by passing a unique value to the user you are authenticating and checking it when the authentication is complete.
Your URL should look like this:
https://sso.chaster.app/auth/realms/app/protocol/openid-connect/auth?client_id=client_id&redirect_uri=https%3A%2F%2Fyourapp.com%2Fcallback&response_type=code&scope=profile&state=state_key
Redirect your users to this URL.
Step 2: User authorizes application
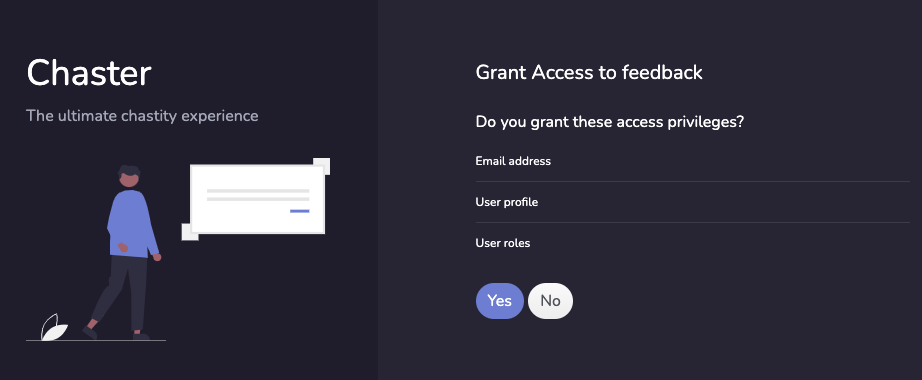
When the user clicks the link, they must first log in to Chaster, unless they are already logged in. Then they will be prompted by the service to authorize or deny the application access to their account. Here is an example authorize application prompt:

Step 3: Application receives Authorization Code
If the user authorizes the application, the service redirects the user to the application redirect URL, which was specified in the authorization URL, along with a temporary authorization code. The redirect would look something like this:
https://yourapp.com/callback?code=AUTHORIZATION_CODE&state=state_key
The state parameter is also included if you provided one in the previous step. If the states don't match, the request may have been created by a third party and you should abort the process.
Authorization codes may only be exchanged once and expire 10 minutes after issuance.
Step 4: Application exchanges the authorization code for an access token
Your application should now exchange the provided authorization code for an access token. You may send a POST request to the Token URL with the following POST parameters:
- client_id=client_id: the application's client ID
- client_secret=client_secret: the application's client secret
- grant_type=authorization_code: specifies that your application is exchanging an authorization code
- code=AUTHORIZATION_CODE: the temporary authorization code
- redirect_uri=redirect_uri: must match the previous redirect_uri parameter included in the authorization request
Here is an example of request to exchange the authorization code for an access token:
curl --location --request POST 'https://sso.chaster.app/auth/realms/app/protocol/openid-connect/token' \
--header 'Content-Type: application/x-www-form-urlencoded' \
--data-urlencode 'client_id=<client_id>' \
--data-urlencode 'client_secret=<client_secret>' \
--data-urlencode 'grant_type=authorization_code' \
--data-urlencode 'code=<authorization_code>' \
--data-urlencode 'redirect_uri=<your_redirect_uri>'
In case of a successful request, here is an example response that contains the access token:
{
  "access_token": "...",
  "expires_in": 300,
  "refresh_expires_in": 1800,
  "refresh_token": "...",
  "token_type": "bearer",
  "not-before-policy": 0,
  "scope": "profile"
}
Refresh your access token
The access token has a limited lifetime, and expires after a certain time, defined in the response of the access token request. To get a new access token, use the refresh token given earlier and make a new POST request using the Token URL, with the following POST parameters:
- client_id=client_id: the application's client ID
- client_secret=client_secret: the application's client client_secret
- grant_type=refresh_token: specifies that your application is exchanging a refresh token
- refresh_token=refresh_token: the user refresh token
Here is an example of request to exchange the refresh token for an access token:
curl --location --request POST 'https://sso.chaster.app/auth/realms/app/protocol/openid-connect/token' \
--header 'Content-Type: application/x-www-form-urlencoded' \
--data-urlencode 'client_id=<client_id>' \
--data-urlencode 'client_secret=<client_secret>' \
--data-urlencode 'grant_type=refresh_token' \
--data-urlencode 'refresh_token=<refresh_token>'
In case of a successful request, here is an example response that contains the access token:
{
  "access_token": "...",
  "expires_in": 300,
  "refresh_expires_in": 1800,
  "refresh_token": "...",
  "token_type": "bearer",
  "not-before-policy": 0,
  "scope": "profile"
}